What This Article Covers
This article explains how to normalize audio loudness with ffmpeg’s loudnorm filter using LUFS-based targets.
Instead of just pasting commands, it also covers:
- What
LUFSmeans - The main
loudnormparameters - When to use
1-passvs2-pass - Why re-encoding is required after normalization
- Basic settings that make MP3 metadata and artwork easier to preserve
For a Python-based implementation that batch-processes files through ffmpeg, see Python MP3 Volume Normalizer with ffmpeg: How It Works and How to Use It.
Table of Contents
- Prerequisites
- What Is LUFS?
- Start Here: Basic Command (1-Pass)
- Main loudnorm Parameters
- When to Use 1-Pass vs 2-Pass
- Why loudnorm Can Make an Intro Sound Louder
- Re-Encoding Is Required After Normalization
- Basic Settings That Help Preserve Tags and Artwork
- How to Think About Filter Chains
- Practical Templates
- Summary
Prerequisites
ffmpeg6.x is available (installation reference: this Qiita article)- The examples mainly target MP3, but the same ideas mostly apply to AAC, WAV, and FLAC
- The commands are written in a style that is easy to read in both PowerShell and bash
What Is LUFS?
LUFS (Loudness Units relative to Full Scale) is a unit for perceived loudness based on ITU-R BS.1770. Values are usually negative, and numbers closer to zero mean louder audio.
The reference for maximum digital sample amplitude is 0 dBFS, not 0 LUFS. LUFS is a separate metric for perceived loudness, which is why TP (True Peak) limits are discussed in relation to 0 dBFS.
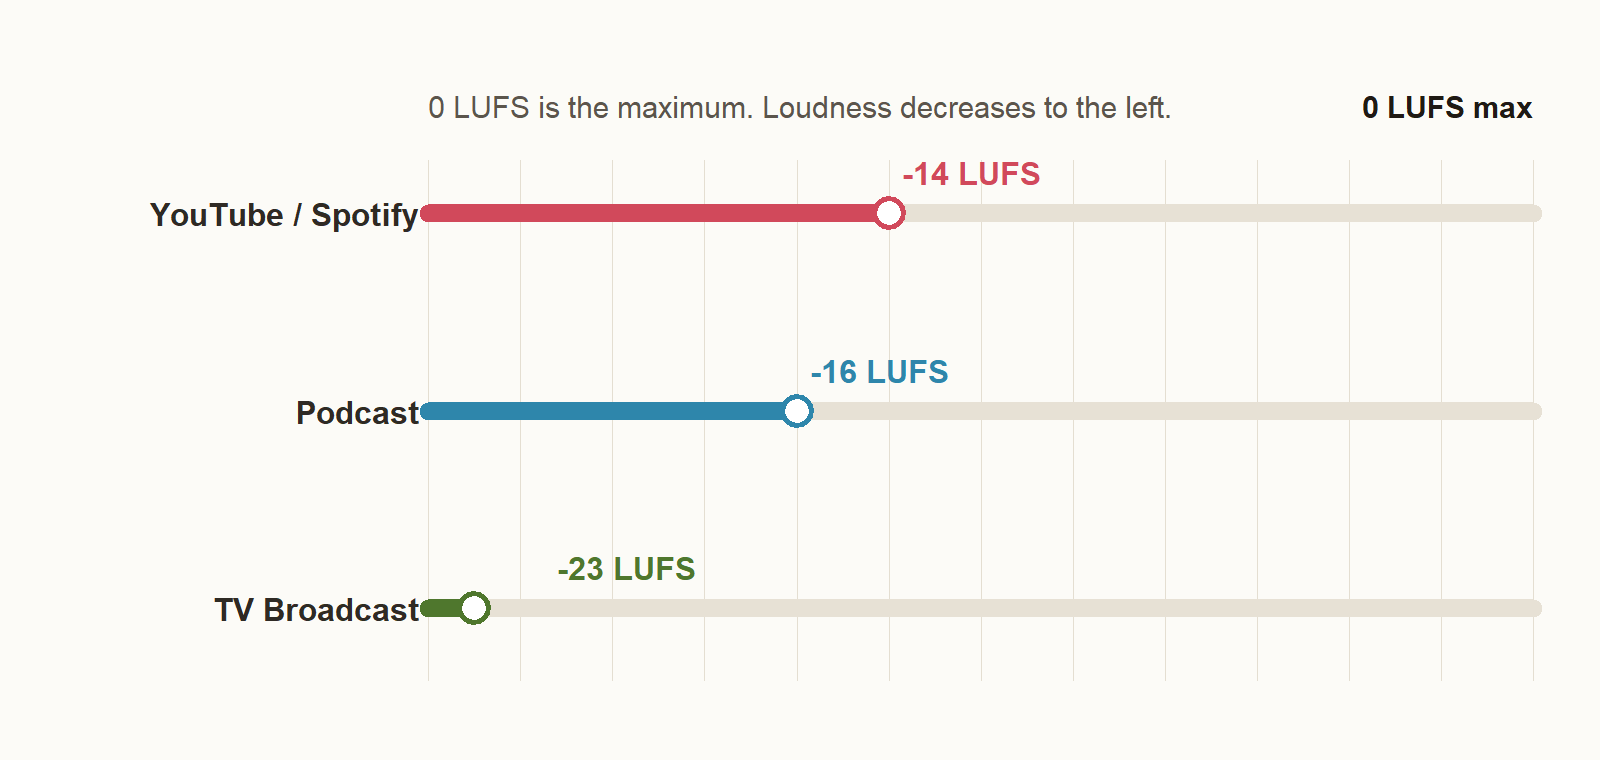
Typical practical targets used in distribution workflows are as follows. These are not universal hard standards for every platform, but common working references.
| Platform | Practical LUFS Target |
|---|---|
| YouTube / Spotify | Around -14 LUFS |
| Podcast | Around -16 LUFS |
| TV Broadcast (EBU R 128) | -23 LUFS |
Note: Spotify applies playback loudness normalization, and the reference level can vary depending on the playback mode. YouTube also does not publish a simple official rule saying “always master to -14 LUFS.” Check the latest platform documentation when exact delivery requirements matter.
Start Here: Basic Command (1-Pass)
Before going deeper, here is the quickest practical example:
ffmpeg -i input.mp3 \
  -map 0 -map_metadata 0 -c:v copy \
  -af "loudnorm=I=-14:TP=-1.5:LRA=11" \
  -c:a libmp3lame -q:a 2 \
  output.mp3
Here is what each option does:
| Option | Meaning |
|---|---|
-i input.mp3 | Input file |
-map 0 | Includes all input streams such as audio and artwork |
-map_metadata 0 | Copies metadata such as ID3 tags |
-c:v copy | Copies album artwork without re-encoding it |
-af "loudnorm=..." | Applies the loudness normalization filter |
-c:a libmp3lame | Re-encodes audio as MP3 |
-q:a 2 | High-quality VBR setting |
If you need tighter alignment to the target loudness, use 2-pass, covered below.
Main loudnorm Parameters
The main parameter groups to understand are these:
| Parameter | Meaning |
|---|---|
I | Target LUFS (Integrated Loudness) |
TP | True Peak ceiling |
LRA | Target Loudness Range |
linear | Whether to use linear correction |
measured_* | First-pass measurements passed into 2-pass |
I (Target LUFS)
This is the main target that decides where the final loudness should land.
I=-14: YouTube, SpotifyI=-16: PodcastI=-23: TV and broadcast-style delivery
TP (True Peak Ceiling)
This sets the effective peak ceiling including inter-sample peaks. Even when the waveform does not visually clip, playback or conversion can still create peaks above 0 dBFS, so leaving some headroom is standard practice.
If you are unsure, starting around -1.5 dBTP is a safe default.
LRA (Loudness Range)
LRA represents the amount of loudness variation across a track. Higher values mean bigger differences between quiet and loud sections, which is more common in classical music or film audio.
| Genre / Use | Typical LRA |
|---|---|
| Pop / Rock | 6-10 |
| EDM / Dance | 4-8 |
| General music | 6-12 |
| Classical / Film audio | 12-20 |
In practice, it is usually best to decide I and TP first, and only adjust LRA when the material or delivery purpose clearly calls for it. If you are unsure, LRA=11 is a reasonable default.
linear
linear=true tells loudnorm to use linear gain correction when possible. In that mode, the whole track is shifted up or down more uniformly, while keeping the original dynamics relationship largely intact.
This is commonly used in 2-pass processing. In 1-pass, linear correction is not always fully achievable.
measured_*
These parameters pass the first-pass measurements into the second pass.
measured_* | First-pass JSON field |
|---|---|
measured_I | input_i |
measured_TP | input_tp |
measured_LRA | input_lra |
measured_thresh | input_thresh |
offset | target_offset |
When to Use 1-Pass vs 2-Pass
1-Pass
This analyzes and normalizes in a single ffmpeg run. It is simple and fast, which makes it good for quick trials and batch processing.
ffmpeg -i input.mp3 \
  -af "loudnorm=I=-14:TP=-1.5:LRA=11" \
  -c:a libmp3lame -q:a 2 \
  output.mp3
The tradeoff is that it tends to be less precise than 2-pass when you care about strict target matching.
2-Pass
This measures the file in the first pass, then uses the measured values in the second pass. It is more stable when you need the output to land closer to the intended target.
Pass 1: measure only
ffmpeg -i input.mp3 \
  -af "loudnorm=I=-14:TP=-1.5:LRA=11:print_format=json" \
  -f null -
This does not produce an output file. Instead, it returns JSON containing:
input_iinput_tpinput_lrainput_threshtarget_offset
Pass 2: use the measured values
ffmpeg -i input.mp3 \
  -map 0 -map_metadata 0 -c:v copy \
  -af "loudnorm=I=-14:TP=-1.5:LRA=11:linear=true:measured_I=-18.3:measured_TP=-0.7:measured_LRA=9.5:measured_thresh=-29.2:offset=-0.1" \
  -c:a libmp3lame -q:a 2 \
  output.mp3
If you are building a tool around ffmpeg, it is usually easier to separate the measurement phase from the production conversion phase.
Why loudnorm Can Make an Intro Sound Louder
loudnorm decides the gain adjustment from the integrated loudness of the whole track. It does not treat a quiet intro as a separate section.
That means intros may end up sounding louder than expected in tracks like these:
- Songs with an extremely quiet intro and a much louder later section
- Material with naturally wide dynamics
This is especially noticeable with linear=true, because the whole track is shifted more uniformly. TP only limits peak ceiling; it does not prevent the perceived loudness of a quiet intro from increasing.
Useful mitigations include:
- Prefer
2-passover1-pass - Lower the target LUFS slightly
- Combine normalization with pre-editing or other dynamics processing when the source needs it
Re-Encoding Is Required After Normalization
When you use an audio filter like loudnorm, ffmpeg has to decode the audio, process it, and encode it again. That means audio stream copy (-c:a copy) is not an option.
-c:a libmp3lame -q:a 2
Common choices:
| Option | Meaning |
|---|---|
-c:a libmp3lame | Re-encode as MP3 |
-q:a 2 | VBR quality setting; lower numbers mean higher quality |
-b:a 192k | Use when you want an explicit bitrate for CBR or ABR-style output |
For a practical balance of quality and file size, -q:a 2 or -q:a 3 is a good place to start.
Basic Settings That Help Preserve Tags and Artwork
MP3 files can contain more than audio: they may also include metadata (ID3 tags) and embedded cover art. If you leave out the mapping options, it is easy to end up with a file that still plays but has missing artwork or tags.
-map 0 -map_metadata 0 -c:v copy
| Option | Meaning |
|---|---|
-map 0 | Includes all streams from the input |
-map_metadata 0 | Copies metadata from the input |
-c:v copy | Copies the image stream without re-encoding |
Embedded MP3 cover art is usually handled internally as an image stream. If your output only maps audio, that stream gets dropped.
That said, some custom ID3 frames or embedded lyrics may still fail to survive depending on the input structure. If metadata preservation matters, verify the output with a dedicated tag tool such as id3v2 or eyeD3.
How to Think About Filter Chains
With -af, you can chain multiple filters in order by separating them with commas.
ffmpeg -i input.mp3 \
  -af "afftdn,agate,loudnorm=I=-14:TP=-1.5:LRA=11" \
  -c:a libmp3lame -q:a 2 \
  output.mp3
Common filter roles:
| Filter | Purpose |
|---|---|
loudnorm | Loudness normalization |
afftdn | Noise reduction |
agate | Noise gate |
Noise reduction and gating can be too aggressive on some material. In most cases, it is safer to get loudnorm working well first, then add preprocessing only if needed.
Practical Templates
Quick Start: 1-Pass
ffmpeg -i input.mp3 \
  -map 0 -map_metadata 0 -c:v copy \
  -af "loudnorm=I=-14:TP=-1.5:LRA=11" \
  -c:a libmp3lame -q:a 2 \
  output.mp3
More Accurate: 2-Pass
Pass 1
ffmpeg -hide_banner -i input.mp3 \
  -af "loudnorm=I=-14:TP=-1.5:LRA=11:print_format=json" \
  -f null -
Pass 2
ffmpeg -i input.mp3 \
  -map 0 -map_metadata 0 -c:v copy \
  -af "loudnorm=I=-14:TP=-1.5:LRA=11:linear=true:measured_I=...:measured_TP=...:measured_LRA=...:measured_thresh=...:offset=..." \
  -c:a libmp3lame -q:a 2 \
  output.mp3
Replace ... with the values returned from the first pass JSON.
Summary
| Point | Summary |
|---|---|
| Choosing targets | Start by deciding I, then use TP=-1.5 and LRA=11 as practical defaults |
1-pass vs 2-pass | Use 1-pass for speed, 2-pass for better accuracy |
| Re-encoding | With filters, -c:a libmp3lame -q:a 2 or similar encoding settings are required |
| Tag and artwork preservation | Use -map 0 -map_metadata 0 -c:v copy as the basic preservation setup |
| Tool design | Separate measurement (-f null -) and production conversion into two phases |
If you want to automate this from Python or wrap it in a GUI/CLI workflow, see Python MP3 Volume Normalizer with ffmpeg: How It Works and How to Use It.