What This Article Covers
This article explains how to normalize audio loudness with LUFS using ffmpeg’s loudnorm filter.
Instead of only pasting commands, it also covers:
- What
LUFSis - What
ffmpegis - Core parameters of loudness normalization
- Why re-encoding is required after normalization
- How to keep MP3 metadata and artwork as much as possible
For an implementation-focused write-up about batch normalization from Python, see Python MP3 Volume Normalizer: LUFS Auto-Normalization with ffmpeg.
Table of Contents
- Target Audience
- Prerequisites
- What is LUFS?
- What is ffmpeg?
- Key loudnorm Parameters
- 1-Pass vs 2-Pass
- Why Introductions Can Sound Louder After loudnorm
- Re-Encoding Is Required
- Keep Tags and Artwork with Stream Mapping
- Filter Chain Basics
- ffmpeg for Measurement
- Practical Templates
- Summary
Target Audience
- You want to normalize volume with
ffmpeg, butloudnormarguments are still unclear - You want to preserve MP3 artwork and tags while normalizing
- You want to understand the full workflow
Prerequisites
- You can use
ffmpeg6.x (installation reference: this Qiita article) - Main target is MP3, but the same approach mostly applies to AAC/WAV/FLAC
- Commands are written so they are easy to read in both PowerShell and bash
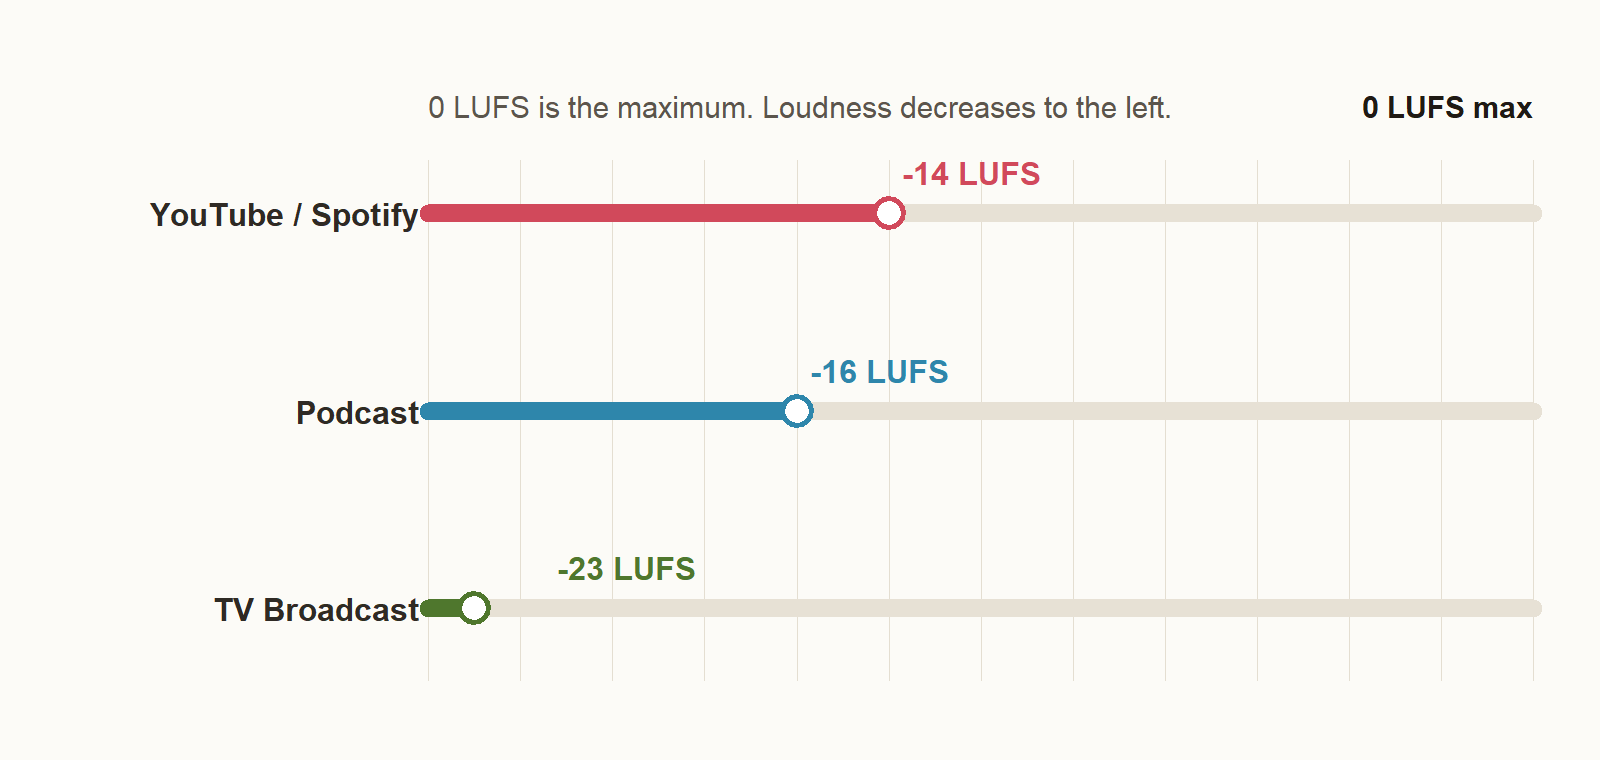
What is LUFS?
LUFS (Loudness Units relative to Full Scale) is a unit of perceived loudness designed to align with human hearing.
In digital audio, 0 is the maximum, so practical values are usually negative.
What is ffmpeg?
- Official site: https://ffmpeg.org/
- GitHub: https://github.com/FFmpeg/FFmpeg
ffmpeg is an open-source multimedia toolset for processing video and audio. From the command line, it can handle conversion, editing, and analysis.
If you want to use it from Python, you can install ffmpeg and use wrappers such as ffmpeg-python.
This article focuses on loudness normalization for audio files (mainly MP3).
For daily use, start with this baseline command (1-pass):
ffmpeg -i input.mp3 \
  -map 0 -map_metadata 0 -c:v copy \
  -af "loudnorm=I=-14:TP=-1.5:LRA=11" \
  -c:a libmp3lame -q:a 2 \
  output.mp3
Argument Breakdown
-i input.mp3
Input file.
-map 0
Copies all streams in the input (audio, artwork, etc.) to output.
Without it, artwork may be dropped.
Audio only (default-style explicit mapping):-map 0:a
-map_metadata 0
Copies metadata (ID3 tags, etc.) from input 0.
Useful for keeping title, artist, and album info.
When there are two inputs:-map_metadata 1 copies metadata from input 1.
Drop metadata entirely:-map_metadata -1
-c:v copy
MP3 album artwork is often handled as a video stream (attached_pic).
This copies it without re-encoding.
-af "loudnorm=I=-14:TP=-1.5:LRA=11"
Specifies audio filters. Here, loudnorm is used for loudness normalization.
-c:a libmp3lame
Audio codec for MP3 encoding.
-q:a 2
VBR quality level for MP3.2 is high quality (roughly around ~190 kbps average).
output.mp3
Output file name.
For more accurate targeting, use 2-pass, explained below.
Key loudnorm Parameters
These are the first parameters to learn:
| Parameter | Meaning |
|---|---|
I | Target LUFS (Integrated Loudness) |
TP | True Peak ceiling |
LRA | Target Loudness Range |
linear | Whether to apply linear correction |
measured_* | First-pass measurements for 2-pass |
I (Target LUFS)
This is the core setting: the loudness target you want at the end.
Common targets:
I=-14: YouTube, SpotifyI=-16: PodcastI=-23: TV broadcast
TP (True Peak Ceiling)
Defines how high peaks are allowed to go, including inter-sample peaks.
Even if the waveform does not clip visually, playback or conversion can still create effective peaks over 0 dBFS.
So it is common to leave headroom with TP.
Typical values:
TP=-1.0TP=-1.5TP=-2.0
If unsure, start around -1.5 dBTP.
LRA
LRA means Loudness Range, the width of loudness variation within a track.
Higher values mean bigger difference between quiet and loud sections. Classical or movie audio often has higher LRA; pop music is usually lower.
loudnorm uses LRA as a guide for how much variation to preserve.
In practice, focus on I and TP first, then adjust LRA if needed.
LRA=11 is a solid default.
| Genre / Use | Typical LRA |
|---|---|
| Pop / Rock | 6-10 |
| EDM / Dance | 4-8 |
| General music | 6-12 |
| Classical / Film audio | 12-20 |
linear
linear=true means: if possible, apply linear gain correction.
In that mode, the whole track is raised/lowered by almost the same factor.
| Processing | Result |
|---|---|
| +3 dB | Entire track gets louder equally |
| -3 dB | Entire track gets quieter equally |
So the relative dynamics stay similar.
This is often used when passing measured values in 2-pass.
In 1-pass, linear correction may not fully achieve the target.
measured_*
These parameters pass first-pass measurements to second pass:
measured_I<-input_imeasured_TP<-input_tpmeasured_LRA<-input_lrameasured_thresh<-input_threshoffset<-target_offset
In short, 2-pass loudnorm works like this:
“Analyze first, then reuse those exact measurements for correction.”
1-Pass vs 2-Pass
1-Pass
Analyze and normalize in one ffmpeg run:
ffmpeg -i input.mp3 \
  -af "loudnorm=I=-14:TP=-1.5:LRA=11" \
  -c:a libmp3lame -q:a 2 \
  output.mp3
Pros: simple and fast. Good for quick trials and batch work.
Cons: less stable than 2-pass when you need strict target accuracy.
2-Pass
Run analysis first, then normalize using measured values.
First pass (discard output, get JSON):
ffmpeg -i input.mp3 \
  -af "loudnorm=I=-14:TP=-1.5:LRA=11:print_format=json" \
  -f null -
Extract:
input_iinput_tpinput_lrainput_threshtarget_offset
Second pass:
ffmpeg -i input.mp3 \
  -map 0 -map_metadata 0 -c:v copy \
  -af "loudnorm=I=-14:TP=-1.5:LRA=11:linear=true:measured_I=-18.3:measured_TP=-0.7:measured_LRA=9.5:measured_thresh=-29.2:offset=-0.1" \
  -c:a libmp3lame -q:a 2 \
  output.mp3
Pros: more stable and accurate against target loudness. If you are building a tool, separate analysis and conversion phases.
Why Introductions Can Sound Louder After loudnorm
loudnorm decides gain by looking at the whole track’s integrated loudness.
It does not optimize only the intro separately.
So intros may become louder than expected when:
- Intro is very quiet, then chorus gets much louder
- Verse-to-chorus loudness gap is large
- Source has wide dynamics
With linear=true, gain tends to be applied more uniformly, so quiet intros can be lifted together with the loud sections.
TP controls peak ceiling, not perceived intro loudness.
LRA is a dynamics target, not a “protect quiet intro only” control.
Main reasons:
- Correction is based on whole-track loudness
- Large dynamic-gap material lifts quiet parts more easily
Possible mitigations:
- Prefer
2-passover1-pass - Lower target LUFS slightly
- Depending on source, combine with pre-editing or other dynamics processing
Re-Encoding Is Required
When using audio filters like loudnorm, audio must be decoded, processed, and encoded again.
So stream-copy for audio alone is not enough.
Key options:
| Item | Why it matters |
|---|---|
| Re-encoding | Required with filters |
| VBR / CBR | Quality-size tradeoff |
| Bitrate | Too low can degrade quality |
Typical:
-c:a libmp3lame -q:a 2
Guideline:
-c:a libmp3lame: re-encode to MP3-q:a 2: VBR quality setting (lower number = higher quality)-b:a 192k: explicit bitrate for CBR/ABR-like control
For practical quality-size balance, start with -q:a 2 or -q:a 3.
Keep Tags and Artwork with Stream Mapping
MP3 files can include:
- audio
- metadata
- artwork
Careless conversion often leads to:
- audio is fine, but cover art is gone
- some tags are missing
Common safe mapping:
-map 0 -map_metadata 0 -c:v copy
Meaning
-map 0: include all streams from input 0-map_metadata 0: copy metadata from input 0-c:v copy: copy image stream without re-encoding
Why Artwork Gets Lost
Embedded cover art in MP3 is often treated as an image/video stream. If output maps only audio, that stream is dropped.
Also, copying only ID3 metadata does not always guarantee embedded image retention.
So verify both -map 0 and -c:v copy.
Filter Chain Basics
You can chain filters with -af:
ffmpeg -i input.mp3 \
  -af "afftdn,agate,loudnorm=I=-14:TP=-1.5:LRA=11" \
  -c:a libmp3lame -q:a 2 \
  output.mp3
Common filter roles:
| Filter | Purpose |
|---|---|
loudnorm | Loudness normalization |
afftdn | Noise reduction |
agate | Noise gate |
For this article, keep loudnorm as the center.
Noise reduction/gating can over-process some material, so normalize first, then add preprocessing only if needed.
ffmpeg for Measurement
For tooling, it is critical to “measure first, parse JSON.”
Main points:
-f nullprint_format=json
Measurement command:
ffmpeg -hide_banner -i input.mp3 \
  -af "loudnorm=I=-14:TP=-1.5:LRA=11:print_format=json" \
  -f null -
This lets you analyze without writing an output file. From CLI/GUI apps, parse this JSON and feed values into second-pass parameters.
Implementation checklist:
- First pass is measurement only (no output file)
- Parse
input_i, etc. from JSON - Pass
measured_*andoffsetin second pass - Use
-map 0 -map_metadata 0 -c:v copyin production conversion for metadata/artwork retention
Practical Templates
Quick 1-Pass
ffmpeg -i input.mp3 \
  -map 0 -map_metadata 0 -c:v copy \
  -af "loudnorm=I=-14:TP=-1.5:LRA=11" \
  -c:a libmp3lame -q:a 2 \
  output.mp3
Accurate 2-Pass
Pass 1:
ffmpeg -i input.mp3 \
  -af "loudnorm=I=-14:TP=-1.5:LRA=11:print_format=json" \
  -f null -
Pass 2:
ffmpeg -i input.mp3 \
  -map 0 -map_metadata 0 -c:v copy \
  -af "loudnorm=I=-14:TP=-1.5:LRA=11:linear=true:measured_I=...:measured_TP=...:measured_LRA=...:measured_thresh=...:offset=..." \
  -c:a libmp3lame -q:a 2 \
  output.mp3
Summary
- Core
loudnormparameters:I,TP,LRA,linear,measured_* - Use
1-passfor speed,2-passfor precision - Audio re-encoding is required when filters are used
- To preserve MP3 tags/artwork, use
-map 0 -map_metadata 0 -c:v copy - For tool development, measurement phase with
print_format=jsonand-f null -is essential
If you want Python-based automation with GUI/CLI, check Python MP3 Volume Normalizer: LUFS Auto-Normalization with ffmpeg.